Creating a Resource Class


Last updated Dec 8th, 2019 | Page history | Improve this page | Report an issue
Support the team building MODX with a monthly donation.
The budget raised through OpenCollective is transparent, including payouts, and any contributor can apply to be paid for their work on MODX.
Backers
Budget
$0 per month—let's make that $500!
Learn moreThis tutorial is part of a Series:
- Part I: Creating a Custom Resource Class
- Part II: Handling our CRC Behavior
- Part III: Customizing the Controllers
- Part IV: Customizing the Processors
We're going to create a sample Custom Resource Class (CRC) that does a very simple task - it outputs a copyright on the bottom of a page with the current date. Yes, something this trivial should be done by placing a Snippet in your Template, but we want to illustrate the concept of CRCs using something very, very simple, so bear with us. :)
This page deals with Part I - creating the actual Custom Resource Class itself. Part II will actually implement the behavior of appending the copyright. Part III will deal with overriding the Controllers, and Part IV will deal with overriding the Processors. The files used in this tutorial can be found on GitHub for reference: https://github.com/modxcms/CopyrightedResource
Create your XML Schema
First, we are going to create a xPDO package using a schema (if you're not familiar on how to do this, please review the page on Developing an Extra in MODX Revolution tutorial and/or the xPDO Defining a Schema tutorial).
If you are planning on versioning this code in Git, your paths may be different, but ultimately you want your files to end up inside the core/components/your_component/ directory. So for this tutorial our package is named "copyrightedresource", so we will create the schema file core/components/copyrightedresource/model/schema/copyrightedresource.mysql.schema.xml:
<?xml version="1.0" encoding="UTF-8"?>
<model package="copyrightedresource" version="1.0" baseClass="xPDOObject" platform="mysql" defaultEngine="MyISAM">
    <object class="CopyrightedResource" extends="modResource" />
</model>
Note that the "package" attribute in the XML should reflect the exact name of our package: "copyrightedresource".
Generating your Class Files
The next step is to generate the maps and classes for the model. You can do this using your own script, you'll just want to refer to the docs on Generating the Model Code and xPDO's parseSchema() function. We've provided a sample script below. It's a modified version of the script used when Reverse Engineering xPDO classes from an existing Database Table.
Create the script at the web root of your MODX site, then execute it by hitting that page in a browser.
Refer to the script at parse_schema.php and adjust it to your own setup.
After this script runs, a handful of PHP files should have been created inside your core/components/copyrightedresource/model/ directory. See the image below.

The copyrightedresource.class.php file should look like this:
<?php
class CopyrightedResource extends modResource {
}
If the class files did not get created, the sample script should help you identify errors (usually permissions).
Customizing your PHP class
Once we have the basic PHP classes generated, we need to customize them.
Be Careful! Once you've got your PHP classes generated, do not re-run the Parsing Script! Doing so will destroy the changes that you're going to be making.
Now we want to force the class_key of the resource, and ensure that it shows up in the Resource Create context menu (which we'll configure later on). Edit the core/components/copyrightedresource/model/copyrightedresource/copyrightedresource.class.php file to have this code:
<?php
class CopyrightedResource extends modResource {
    public $showInContextMenu = true;
    function __construct(xPDO & $xpdo) {
        parent :: __construct($xpdo);
        $this->set('class_key','CopyrightedResource');
    }
}
This forces the class_key to "CopyrightedResource", which is our class, and ensures our Resource class shows up in the left-hand tree's context menu. This is how we govern the value set in the modx_site_content "class_key" column.
You should never add fields to the modResource table (yes, some Extras have done this, but it's not the proper way). Rather, create a separate related table to join into, or use Revolution 2.2.1+'s new properties field to store extra data.
Getting Familiar with the modResourceInterface Interface class
For those of you geeks who want to code responsibly, it's a very good idea to look at the parent class here, so have a look inside the core/model/modx/modresource.class.php.
Code Responsibly Any time you extend a PHP class, you should look at the parent class, otherwise you won't know what you are implementing!
If you look in the modResource class file, you'll see at the top a PHP Interface that defines what methods must be defined for a CRC to work:
interface modResourceInterface {
    public static function getControllerPath(xPDO &$modx);
    public function getContextMenuText();
    public function getResourceTypeName();
}
We'll now go into detail on each of these methods and how they implement our CRC.
Create a Namespace
Before we go any further, create a Namespace for your component. For the sake of clarity, the name should match the name of your package: "copyrightedresource".
Log into the MODX manager and head to System -> Namespaces. (gear icon at upper right)
Namespace: copyrightedresource
Core Path: {core_path}components/copyrightedresource/
Assets Path: {assets_path}components/copyrightedresource/
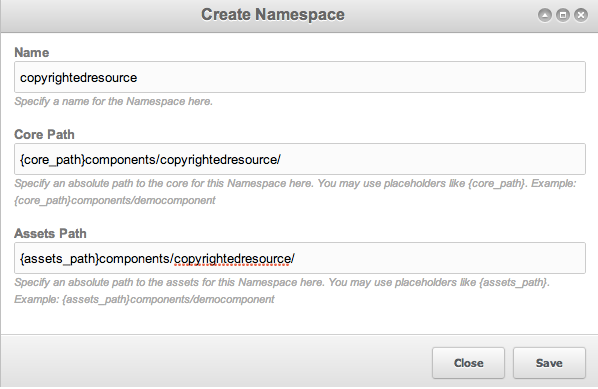
Note the special placeholders you can use to refer to your directories.
Adding the getControllerPath Method
Once you've added a namespace, we're going to add the getControllerPath method to our class by adding this to your copyrightedresource.class.php class:
public static function getControllerPath(xPDO &$modx) {
    return $modx->getOption('copyrightedresource.core_path',null,$modx->getOption('core_path').'components/copyrightedresource/').'controllers/';
}
This method tells MODX to look for our manager controllers in our custom directory, thereby overriding the standard default controllers. The line first checks for a custom System Setting that shows where our CRC core directory path is (we add this setting to make our life easier when we are developing the code so we can keep it in a location that is non-standard so that we may version it more easily). If the System Setting has not been set, the code will look for our CRC path in 'core/components/copyrightedresource/'. It looks in the "controllers/" subdirectory.
Great! MODX will now look for our controllers in that directory. We'll get into creating those in Step 2 of the tutorial.
Adding the getContextMenuText Method
Go ahead and add this method to your class:
public function getContextMenuText() {
  $this->xpdo->lexicon->load('copyrightedresource:default');
  return array(
    'text_create' => $this->xpdo->lexicon('copyrightedresource'),
    'text_create_here' => $this->xpdo->lexicon('copyrightedresource_create_here'),
  );
}
This returns two translated strings that MODX will insert into the "Create" context menu when right-clicking on a node in the Resource tab on the left-hand tree.
You will need to create the lexicon folders and file in core/components/copyrightedresource/lexicon/en/default.inc.php with the language strings, or more simply, upload the core/components/copyrightedresource/lexicon/ folder from the github files.
Just to be clear, you don't necessarily need to use the MODX lexicon here. You could return the text like so:
public function getContextMenuText() {
  return array(
    'text_create' => 'Copyrighted Page',
    'text_create_here' => 'Create a Copyrighted Page Here',
  );
}
And that'd work fine. But MODX allows you to load a Lexicon Topic so that you can translate the strings for your worldwide users.
Adding the getResourceTypeName Method
This final method tells MODX what the translated "name" of your CRC is. We probably don't want to call it "CopyrightedResource", so we're going to plop in this method:
public function getResourceTypeName() {
  $this->xpdo->lexicon->load('copyrightedresource:default');
  return $this->xpdo->lexicon('copyrightedresource');
}
Again, this could just return a string:
public function getResourceTypeName() {
  return 'Copyrighted Page';
}
This tells MODX to call it a "Copyrighted Page", rather than its class name, when dealing with it in the manager.
Adding the Class to Extension Packages
To load the CRC properly, you'll need to add it to the Extension Packages. Why? Well, MODX needs to load your CRC when it loads, so that it has a "library" of sorts of all the loaded Resource Classes available to it. MODX 2.2 provides you with an assistance method to add your package to the Extension Packages dataset:
$modx->addExtensionPackage('copyrightedresource','/path/to/copyrightedresource/model/');
Run this code once and MODX will automatically add it to the Extension Packages. Here is another sample script for helping you to do this:
<?php
/**
 * Use this script to add your extension package to MODX's "radar".
 * This should only need to be done once.
 * Note that we have to instantiate MODX: xPDO is not sufficient
 * because we're running functions that exist only in MODX, not in the
 * underlying xPDO framework.
 *
 * USAGE:
 * 1. Copy this file into the docroot (web root) of your MODX installation.
 * 2. Execute the file by visiting it in a browser, e.g. <a href="http://yoursite.com/add_extension.php"> <a href="http://yoursite.com/add_extension.php"> http://yoursite.com/add_extension.php
</a>
</a>
 */
//------------------------------------------------------------------------------
//! CONFIGURATION
//------------------------------------------------------------------------------
// Your package shortname:
$package_name = 'copyrightedresource';
//------------------------------------------------------------------------------
//  DO NOT TOUCH BELOW THIS LINE
//------------------------------------------------------------------------------
define('MODX_API_MODE', true);
require_once('index.php');
if (!defined('MODX_CORE_PATH')) {
    print '<p>MODX_CORE_PATH not defined! Did you put this script in the web root of your MODX installation?</p>';
    exit;
}
$modx= new modX();
$modx->initialize('mgr');
$modx->setLogLevel(xPDO::LOG_LEVEL_INFO);
$modx->setLogTarget(XPDO_CLI_MODE ? 'ECHO' : 'HTML');
$modx->addExtensionPackage($package_name,"[[++core_path]]components/$package_name/model/");
print 'Success!';
?>
To test whether or not this worked, log into the MODX manager and search the System Settings for the "extension_packages" key. You should see something like this:
[{"copyrightedresource":{"path":"[[++core_path]]components/copyrightedresource/model/"}}]
Note that you can use core_path placeholder in this path: this offers way to ensure that your path will work should you ever migrate your MODX site to a different server.
There's also a removeExtensionPackage as well for removing the package from MODX.
addExtensionPackage and removeExtensionPackage are very useful methods to add to a Resolver if you're building an Extra for your CRC so that this happens on install and uninstall.
Conclusion
Now, if you reload the page and right-click on a Resource in the tree, then move over "Create", you should see this:
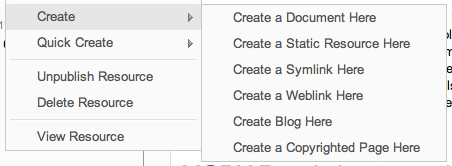
You may need to clear the cache a couple of times.
Fantastic! Now we've got our Custom Resource Class loaded, and we're ready to start actually getting into the nitty-gritty. Proceed onto Step 2!
Support the team building MODX with a monthly donation.
The budget raised through OpenCollective is transparent, including payouts, and any contributor can apply to be paid for their work on MODX.
Backers
Budget
$0 per month—let's make that $500!
Learn more